|
When is it a good idea to save money and do a Do It Yourself treadmill move?
When is it better to spend the money and have professionals do it? This is such a great discussion topic for several reasons. Many peope are shocked when they get the price of a professional treadmill move. The shock is totally understandable, because it is an expensive job, often costing several hundreds of dollars. Let's first talk about that for a little bit. Why does it cost so much to have a treadmill professionally moved?
8 Comments
What's wrong with my Precor 9.33 Residential Treadmill, and how do we fix it?
A gentleman with a Precor 9.33 Treadmill at home recently contacted us with this question. His intitial contact said, paraphrasing, "I have a Precor Treadmill at home. It was working great. Now it stops after just a few minutes of operation. Error 27 is displayed when it stops. What is wrong with the treadmill and what will it take to fix it?" This is such a great (and often mysterious) topic, that we wanted to publish it for all to read. Hopefully we can de-mystify the situation and take away a little frustration. Precor has some fantastic design engineers and they build fantastic treadmills and other fitness equipment. Sometimes service and repair information, for the average treadmill owner, can be a little, shall we say, challenging to find. Luckily, we are what you call professionals, and we have the answers. Bottom line up front: Error code 27 means the drive motor has pulled maximum current - usually due to worn walking belt and deck. There are other situations where the drive motor will pull maximum current, such as when there is a drop in supply voltage. When the available voltage drops, the amp draw increases. The treadmill drive motor might also pull excessive current if it the maximum user weight is exceeded, or if a foreign object gets jammed somewhere and seizes the walking belt or rollers, or of the roller bearings are failing. In most cases, it means the walking belt and deck are well worn and need to be replaced. The very smart Precor engineers built in this safe guard to protect more sensitive electronics on the treadmill, such as the Power Control Module also called the lower control board or motor control board. What does it take to fix it? The walking belt and deck need to be replaced. While you are at it, the drive belt should be replaced. The deive belt probably needs to be replaced, but even if not needed immediately, you should do it. The reason is that the walking belt, deck, and drive belt are all wear items and all need to be replaced from time to time. If you replace the drive belt at the same time as your are replacing the walking belt and deck, then you will save a bunch of money on labor. If you only replace the treadmill walking belt and deck, and then 3 months later, decide to replace the drive belt, you'll be charged regular labor rates for the work. The cost of the drive belt part is pretty cheap, relatively. How about the cost? At the time of this writing, the Precor 9.33 Treadmill walking belt is $297. The Deck is 295. The drive belt is $44. These figures do not include tax, shipping, or any handling charges. A lot of folks balk at such a high repair bill. Our advice is that repair is generally always less expensive that replacement, so if the treadmill is otherwise in oretty good shape and is giving you the kind of workout that you want, then it makes financial sense to repair it. If, on the other hand, you are thinking about some other features or a bigger or faster, new treadmill, then this is a good time to buy one. The deck on the Precor 9.33 treadmill is reversible. That means it is doublesided and can be flipped over, so that the othersise can be run on for a, hopefully, a couple years. If it has not yet been flipped, then we can repair it by just replacing the walking belt and the drive belt and flipping the deck. Please check your service records and see if that deck has been flipped or not. That info will give us a pretty good idea of what we need to do to get it fixed.
Or, Handy Maintenance & Service tips for Residential & Commercial Elliptical Trainers. **** VIRTUAL **** service calls Learn More $49.0 To better support you, your fitness goals, and health, we are now offering virtual troubleshooting, service, and repair guidance. All online. Elliptical service tips. "Help. My Elliptical trainer is knocking when I use it." "My Elliptical trainer feels wobbly." "My elliptical makes a whining or scraping noise." These are the most common complaints/questions we get for elliptical type trainers and cross trainers. Here's some useful info to help understand the reasons for these problems, and what we can do about it. Repair your elliptical yourself, or give us a call. We're happy to help. Knock and Level: Old elliptical trainers are noisy and usually have a knock, from a rotating arm inside the flywheel housing hitting the plastic housing. This is caused by a few things: Ellipticals are not very rigid and are subject to a lot of torsional force (twisting around the center axis): Aggravated in residential and commercial settings by being placed on a carpet; and not kept level or properly supported. 100% of older ellipticals knock (in my experience). If on a thick, plush carpet, can't really level. Put a piece of 3/4" OSB under the machine. We will do this for our for customers for $55 +tax and trip. If on a hard, level surface, then check the level of the machine, and adjust so that it is level. MAKE SURE leveller feet are still there and still have the little rubber foot. The wear bushings in ellipticals wear out over time, and make the arms and limbs looser than original fit. When this gets too bad, the foot platforms will actually start to rotate or pronate. PARTS ARE CHEAP to replace, but is a lot of labor. Wear. Ellipticals biggest wear items are the rollers for the left and right platforms. They should be wiped clean before every use, but this rarely happens. Dirt builds up and the wheels wear, spall, or chip unevenly. This affects the ride, feel, and noise of the machine. Inspect the wheels carefully on every machine. Replacement is warranted for uneven wear on the wheel of any kind. The flywheel housing. This is difficult to get in to. Fasteners are hidden. The rotating arms are very hard to remove, and it is hard to maneuver the plastic housing around. CALL technical support if you need to take the housing completely off. Use extra caution when the housing is off and still around the rotating arms. disassemble as little as possible. DON"T take it apart if you don't have the tools and personnel to put it back together. Drive belt: This is a wear item. It needs to be checked during a service. Look for rubber spall or rubber bits inside the housing as a sign of wear. Inspect the belt for dry rot, cracks, glazing, and splitting. Check the inside grooves of the belt: grooves should be pronounced, not worn off, and not all filled up with gunk, dirt, and hair. Replace if any of those conditions exist. Frame assembly, uprights, console, arms: These things are supposed to be checked and tightened on a routine basis, which does not get done in most cases. The elliptical arms become loose and wobbly. Check and tighten assembly points, which are usually hidden behind plastic body parts/shrouds. Usually need metric allen wrenches or phillips drivers. all for now. That's it for now. Go forth and don't break anything :) Or, How to avoid the most costly treadmill repair bills.
Bottom line up front: Perform routine maintenance and service on your treadmill every 6 months at a minimum, in order to avoid expensive ($500) repair bills. The single biggest cause of major component failure in treadmills, from Full Commercial down to Residential quality machines, is one simple thing: Dirt! Back story: Treadmills and other pieces of fitness equipment have been built to last "forever" in the settings they were built to serve. That is to say, a full commercial treadmill is built to run 24 hours a day, 7 days a week, 365 days a year, for at least the length of the warranty period. Usually that's from 2-5 years. Frames and motors are warrantied for life. Light Commercial treadmills are designed for up to 6 hours of use per day. Residential treadmills are all over the board, but we can lump them together and say that they are good for "a couple" hours of use per day. However, even some of today's new residential rated treadmills have guaranteed for life frames and motors. It's safe to say that treadmills in particular and fitness equipment in general is built exceedingly well and should provide years and years of faithful service to your runners, guests, and residents. But they break, and the repairs are often more than replacement cost for residential models: Typical motor failure, parts and labor, $500. Typical board failure, parts and labor, $450. Typical belt failure, parts and labor, $350. Repair bills go up from there. Repair parts for commercial equipment, especially some of the older models are quite expensive, as they are no longer made new and must be re-manufactured, or are made by aftermarket specialists. Residential treadmills are usually inexpensive on the front end, but very difficult and expensive to fix in the long run. Like computer printers, it's usually easier and less expensive to just buy a new one. SO back we go to the topic: Why do these "built to last" treadmills break? It's dirt, more than anything. What happens? If the treadmill is not serviced about every 6 months, things start to go bad. Like a liver, it takes a long time for the abuse to show up, and then when it does, it is catastrophic, usually resulting in major component failure (belt, control board, motor). Dirt, hair, dust and other contaminants build up between the walking belt and the deck, around the motor, and on the control board, not to mention all over the working parts of the treadmill. Increased Friction: Dirt builds up between the walking belt and deck, increasing the friction between these two critical parts. Sometimes people put in more lube. Sometimes that helps, but if the belt wasn't cleaned ahead of time, it can hurt. More dirt gets stuck in there, which increases the friction. When there is more friction, the motor has to work harder to move the belt at the right speed. More work draws more power. More power going through the control board generates excessive heat. Components start to fail. Wicking Lubrication: What is that? Modern roller bearings, like those on the front and rear roller of the treadmill, are lubed for life, meaning we never need to get in there and add more grease, and the bearing should last the entire life of the equipment. But we still see bearing failure caused by dirt. Hair and fine dust particles actually work there way in to the bearing and start to add friction, which generates heat. This dirt and hair also starts to wick away the oil in the grease. (side note: grease is a compound made of of liquid oil, held in suspension by a soap sponge). Added heat brings more oil out of suspension, which means more of it wicks away from the bearing, which increases the heat.. and You see where this is going. Over a while, we get bearing failure. Along the way, though, we added to the work the motor had to do in order to keep the belt moving, and hastened along the eventual control board failure. Unusual Wear and Tear: While the walking belt and deck are dirty, they are wearing at an unusual rate. Too much dirt, and not enough lubrication will cause premature failure of both the deck and the walking belt. Routine service is the single best thing we can do to keep that treadmill running right and not need extensive repairs. Every 6 months, a competent professional should spend an hour taking the machine apart, inspecting, cleaning, and lubricating. It's like changing the oil in a car: It's easy and cheap, unless it is not done, and then stuff gets expensive real fast.  Routine service: cleaning, inspection, and lubrication following manufacture's recommended schedule. Is it worth it?
We need to devote an entire blog to just this subject of service and repair of fitness and exercise equipment, but, for now, here's something to go on. The short answer is an easy, "Yes". All fitness and exercise equipment should be routinely serviced and maintained. It's just like a car, truck or any other mechanical equipment: proper maintenance extends its functional life, lowers total cost of ownership, get's the most out of the initial investment. But it's expensive and the equipment is running fine! We can get by without it. Yes, that is absolutely true. A Full Commercial Treadmill will run non-stop, 24x7, for a very long time, with absolutely zero maintenance, cleaning, or anything. Then, one day, probably years from now, it will die. Let's look at the numbers for two treadmills, both purchased brand new, both in the same exact user environment. Treadmill A does not get routine service. Treadmill B does get routine service. Let's also assume a 6 month service interval, and maybe 500 miles/month use. Treadmill A Treadmill B Miles Initial Cost: $5,500 $5,500 6 mo service 000 $65 3,000 12 mo service 000 $65 6,000 18 month 000 $65 9,000 24 month 000 $65 12,000 30 month 000 $65 15,000 $500 replace belt, flip deck $200 replace worn elevation assy parts 36 months 0000 $65 18,000 Cost @ 3 yrs $5,500 $6,590 Hidden Costs: $500 (new belt) 000 $200 (elev assy) 000 $500 (new motor) 000 $400 (troubleshooting) 000 ???? lost use 000 ??? upset residents 000 ??? LIABILITY FOR NOT MAINTAINING EQUIPMENT THAT COULD INJURE OR KILL PEOPLE! So what's the cost of not doing routine treadmill service and maintenance on Treadmill A? It has the same use as Treadmill B, so it still needs a belt replaced, $500.00. It still needs the deck flipped, $200. Treadmill A, was still cheaper to operate. The owner could have skipped all the routine stuff and just replaced the belt and deck in three years. Hidden costs. Hidden failures. The heart of any treadmill is an electric motor. The two biggest enemies of all electric motors are heat and dirt/filth. With treadmills, especially if they are in a carpeted room, dirt builds up on the electric motor housing, internal parts, bearings, connections. The dirt acts like an insulator, allowing heat that should be dissipated to build up. Overtime, motor performance is degraded by excessive heat build up. Excessive heat can literally cook the grease out of "lubed for life" motor and shaft bearings. Faulty bearings are noisy and require a lot more energy to turn. When the motor has to work harder to do the job, it draws more amps (power). When the motor draws more amps, it creates more heat, which adds to the problem. Then we have what we call a "major component failure". Off the cuff, I'd say that's $500 to replace that motor. Then we have to troubleshoot and figure out what else got torn up when that motor failed? While we are working on getting the "burned up treadmill back to life, it is inoperable. Residents and guests can no longer use the treadmill, plus maintenance guys are running around, doing major repairs, interrupting their work out. Everyone is upset, except the service tech, drawing $65/hour to fix the machine (Actually, he is upset too, because all of this could have been avoided by proper, routine service and maintenance of that poor treadmill). Let's keep everyone happy and maintain that fitness and exercise equipment. Holiday Cheers; Thieves Are Here (not that they ever left) We thank Al Gore for inventing the internet just as much as the next folks do. It makes everything free and easy. Gone are the days when we have to get up, get out of our jammies, shave, and actually leave the house to do.. ugh.. work. Now we can tele-commute and read Reddit all day from the comforts of our home office, instead of having to slog in to bogart the company's resources. Kinda miss that K-cup coffee though.... Of course these internet luxuries are also available to the thieves and hucksters of the world, so they can telecommute too. Unfortunately for hard working, busy business folks, the thieves are not spending all day on Reddit. Rather, the crooks are working diligently to develop ways to separate us from our hard won earnings, data, and reputations. With Christmas and the holiday season right around the corner, if not here already, the crooks are working overtime, just like we are. Here's a pretty clever little sample of a crook who somehow preempted our PayPal administrative actions, luckily by a day. But I wonder what would have happened, if this time, the thief was right on time.  We needed to add an email to our paypal stuff, which we did. However, the day before, someone sent us this little phishing lure. Our email provider labelled it accurately as SPAM and sent it to the spam box. But let's say, the guy's timing was better, and he sent it the following day. The day we would have been looking for an email confirmation note from PayPal? Here's how we know the email is bogus. Hover over the "From" address, and the actual address pops up.  This email looks like it comes from paypal, but is actually from a crook. The bait on this phishing attempt is to get us to go to a site that will look identical to PayPal AND enter our Log-in credentials. The thieves steal our log in creds, change the password, add a bank account, and steal real money. Or maybe they just access our customer data. Or whatever. Bottom line is, we don't want that hassle, and neither do you or your customers :)  The phishing attempt came on October 29th. Here's the legit confirmation email from PayPal, we got on the 30th, when we added John's email to the account.
Sometimes, it's good to be LUCKY and good, but we'll also settle for just luck. We know how it is, even from the jammie comfort of the home office. When we are looking for something that "should" be there, we always check the spam box.. Now we did not open the phishing email, because, you know, with html 5, opening a message can be all it takes. As much as we'd love to show you what's inside it, sometimes discretion is the better part of valor. just trust us, it is a scam. Take away: Right now and for the next 3 - 4 months, it's all out smash and grab season for on line thievery. 1) Train your hard working team on the basics. They want to do things right, and a security breach fouls up everything, along with bringing down team moral. 2) Enforce simple disciplines and protocols for security (hardest to do for OURSELVES). 3) Keep work and play separate, as far as online stuff goes. If one MUST go to check out the latest Vegas odds for football, then do it from a non-critical computer, not the one your quickbooks are on :) 4) Hover first. Even when something looks 100% legit, hover over it before you click. 5) Say no to juicy stories, cute kittens, and emotional tugs that friends send you links to. If you must check it out, look it up on google or some other search engine yourself (Links shared on social sites are the MOST MALWARE infested of any, anywhere). It's Another Security Article! Long gone are the days when internet thievery, creepery, and troll parties haunted mostly the fringes of porn, gambling, and psychic friends websites. And no wonder. Crooks and scammers may be low-life jackasses, but some of them are pretty sharp. Luckily, since they aren't, for the most part, holding down real jobs, they have ALL DAY to figure out and perfect ways to rip-off the busy working folks.
Today's internet is a lot like those fancy restaurants where Fight Club's Tyler Durden worked: Beautiful plate presentations, but woe to those who eat. But the busy people, with more money than time, come in, order the beautiful and safe looking food, eat, and pay, totally unaware that they've just eaten at least a small bit of the most vile filth. Earlier this Spring, some very clever folks started sending out malicious emails that appeared very safe and appealing to busy folks trying to get things done. The emails in this case looked like "EFax" notifications. The idea was that the email would look real enough and busy folks would click on it to get their fax; except, there was no fax. What the people got was a trojan infection. The clever crooks learned that "efaxes" could be "zipped" - that is, compressed. People who actually use the EFax service were used to getting compressed fax files and then un-zipping them. For a crook, this is like shooting fish in a barrel. It's like getting people to rob themselves voluntarily, if unaware. A crook or other hacker can take a legit word document or any other file and attach a small bit of executable code to it - a piece of malware. He then "zips" the files, which masks the malware. This zipped file is then sent to the intended victim. During the un-zipping process, most operating systems will warn the user of potential dangers, but once the user hits that confirmation button to proceed, he has just instructed his computer to execute the code the hacker gift wrapped for him. The catch: These scam emails are back in circulation, and if you check your "SPAM" folder, heck, you might see some in there right now. This is because most services and web mail providers are all over this threat. They put it in your spam box for you. But let's just say your business is waiting on an important fax that has not come through yet. What do we do? We look for it. "Check your "Spam Folder", someone advises. And you know what just happened...... Actions Steps: 1) Don't trust zipped files, or .rar or other compressed goods. 2) If you MUST check them out: a) Go to a non-critical computer. b) Download the file. c) Scan the file with a current, top shelf anti-virus, like Webroot. d) Take the computer off line and isolate it from all other networks (WAN and LAN). e) Exercise your curiosity and unpack the file. With any luck, you'll be the hero who found that missing fax :) f) Scan the unpacked file, just to be sure. 3) Train busy team members who are busting a$s to keep the team on top. Nothing breaks up the momentum like a security breach and system downtime.  Oh, Dear Reader, we know YOU are far too wise, albeit, still short of tooth, and sagacious to fall pray to such foolery. We therefore provide, for your entertainment as well as edification, the following, with no lack of brevity :) I don't know about you, but in our business, we use Skype for a ton of communication - daily phone calls, click-to-call convenience, call-from CRM, video call interviews (a tremendous time and resource saver). It's safe to say, we have a lot of skype exposure. Security rule of thumb: The thieves go to where the traffic and MONEY is. It used to be that on-line porn and free sex movie websites were the dangerous neighborhoods online, but my how that has changed. Now thieves target the busy, business streets of ether. So here we have what looks like a legit contact request from someone in banking. Were I too busy to read the long, boring intro, I might have just accepted. But I LIKE to read long, boring..... um, you get that, right? Contact request. Looks like a banker. I investigate. Hmmm. Seems like a scam. $8,000,000USD in some bank. Who IS this person? A Nigerian Prince? But, it is a juicy amount of money. Of course, I won't contact the guy. That would be foolish :) But maybe, I would be tempted to check out the story. It's gossip worthy. 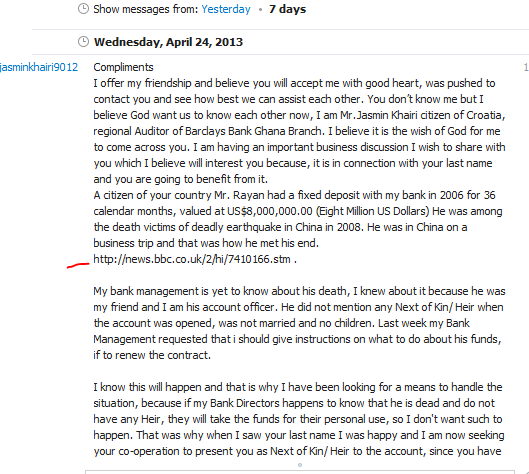 The message raises BIG RED FLAGS. That news link looks LEGIT though. Right?
Now consider this. Thieves are some of the most quick to adapt in any culture. They think about stealing 24x7. So before any one goes clicking any link in this scam, think of this. The OBJECT is NOT to get you to reply back and engage with this guy. It's OBVIOUSLY a rip off. The object of this trick is to get your gossip on, and click the seemingly SAFE news link. News sites are some of the most dangerous, mal-ware infested places on the internet., so even if the link were legit, it would be risky. THIS link looks like it goes to some bbc news; however, it goes somewhere else (we have deleted and removed the link for safety, and the lawyers made us). These days, one merely has to click a link to activate a very fast acting script (that the click has now given permission to run), to activate an HTML5 code that will instantly read, copy and transmit certain targeted spots on your machine - like password storage, picture files.. whatever. We don't want anything leaving our machine without permission, especially those photos from last year's Christmas Party :$ Sweet dreams everyone and, please be safe out there. Some folks say the best way to have money is to not spend it! Truth.
Poor folks blow money on all kinds of stuff, and like Chuck Palahniuk's Tyler Durden observed, "the things you own end up owning you". Go visit and get a good book http://chuckpalahniuk.net/books But, gosh, don't the rich blow all kinds of money too? I mean just WHO is buying all that high-end loot advertised in GQ, Forbes Life, and The Kiplinger Report? And who is manipulating the price of oil and trading carbon credits and junk? That can't be cheap and has to be the work of rich folk. If we may ever so humbly opine: Rich or Poor is not a statement of one's financial position or check book balance or income. Rich or Poor is a description of a state of mind: Rich and Poor folks live differently, no matter how much money they have. Listen to Dave Ramsey http://www.daveramsey.com/home/ and he will tell us that "if we want to be rich, we have to do rich people stuff". We do want to be rich! SO just what is this "rich people stuff" and how do we DO it? We STUDY!! AND READ!! AND TURN OFF THE TELEVISION!! (Turning off the television is rich people stuff! Some studies state that the average adult spends an additional $200 per year for every HOUR of television they watch on a weekly average. If this is true or not, I don't know, but I don't like TV and this makes sense to me. Watching TV, every few minutes, someone is urging us to BUY BUY BUY. I can't imagine soaking a chicken breast in Teriyaki Sauce a couple hours a day and have it come out not tasting just a little bit like Teriyaki Sauce. Brains are probably the same.) SO rich folks don't watch much television, but what about their SPENDING! How can we as "sales people" be urging folks to not spend money?? Rich folks save money, refusing to buy junk. Rich folks spend money on things that will make them more money (not lottery tickets). Some observations: Rich folks will pack their lunch and coffee everyday for work, and eat the same-old same old for weeks. Poor folks will spend $4.79 on lunch and coffee, everyday, and "buy themselves a treat" that they "deserve". The rich has an extra $1,000 or so a year, just on that one difference. Poor folks balk at the thought of spending $499 on a college course. They "can't afford it". Yet over the length of the class they did not take, they will spend $1.89 a day for a bottle of soda.... You see where that is going. Rich folks skip the soda, buy the class, and become more valuable at work, and get a raise. Can spending $5,000 on a piece of equipment be a better deal than a $1.89 bottle of soda? HELL YES! Which one is rich people stuff, buying the capital equipment or the soda? It depends, but, my guess is, successful business owners (the rich folks) are spending a lot less money on soda, as a percentage of revenues, than they are on the right equipment and service. |
**** VIRTUAL **** service calls
Learn More $49.0 To better support you, your fitness goals, and health, we are now offering virtual troubleshooting, service, and repair guidance. All online. Synrgys Solutions Tank Think
We're the Make it Happen People. This is our blog. No excuses. Intentions don't matter. Results do. Archives
June 2016
Categories |

- Home
-
Service.
- Virtual Service Calls >
- Overall Service Schedule >
-
Treadmill Repair.
>
- Treadmill Repair Bloomington, IL.
- Treadmill Repair Champaign, IL.
- Treadmill Repair Urbana, IL.
- Treadmill Repair Charleston, IL.
- Treadmill Repair Coal Valley, Il
- Treadmill Repair Danville, IL.
- Treadmill Repair Decatur, IL.
- Treadmill Repair East Moline, IL.
- Treadmill Repair Effingham, IL
- Treadmill Repair Galesburg, IL.
- Treadmill Repair Kankakee, IL
- Treadmill Repair Mattoon, IL.
- Treadmill Repair Milan, Il
- Treadmill Repair Moline, IL.
- Treadmill Repair Normal, IL.
- Treadmill Repair Peoria, IL.
- Treadmill Repair Quad Cities
- Treadmill Repair Rock Island, IL.
- Treadmill Repair Silvis, IL.
- Treadmill Repair Toledo,OH.
- Treadmill Repair Dayton,OH.
- Treadmill Repair Upper Arlington,OH.
- Treadmill Repair Perrysburg,OH.
- Treadmill Repair Fort Lauderdale, FL
- Treadmill Repair Jacksonville, FL
- Treadmill Repair St. Augustine, FL
- Synrgys Solutions Service Reviews & Treadmill Repair Forum.
- Treadmill Movers. Installation. Assembly.
- Marine
-
Products
- Residential Fitness Equipment
-
SportsArt Equipment
>
- SportsArt ECO-NATURAL™ >
- SportsArt ECO-POWR™ >
- SportsArt SENZA™ >
-
SportsArt Lineup
>
- SportsArt C510
- SportsArt G845 Elliptical Trainer
- SportsArt A991 Adjustable Bench FID
- SportsArt DF205 Dual Bicep Tricep
- SportsArt C535R Recumbent Bike
- SportsArt DS972 Functional Trainer
- SportsArt G545R Eco Powr Recumbent Bike
- SportsArt A983 Smith Machine
- SportsArt A995 Crunch Bench
- SportsArt A993 Hyperextension
- SportsArt A994 VKR Chin Dip
- LifeSpan Fitness equipment >
- Treadmills
- G-Plates >
- Helix Lateral Trainer. >
- Hotels and Hospitality
- Plates and Dumbbells
- Fitness. Cardio.
- Service Request.
- Request a Quote
- FAQs
- Warranty
- Privacy Policy
- Synrgys Speak
- Subscribe to Synrgys Podcasts. Free Loot For You.
- Free Custom Layout & Design Service.
- LifeFitness Center Trial SportsArt C510
-
Lifespanm
- OL LifeSpan Treadmill Mat
- OL LifeSpan C3-DT5 Bike Desk
- OL LifeSpan CT-DT3 Under Bike Desk w/ Console
- OL LifeSpan Unity Junior Pedal Desk
- OL LifeSpan TR5000-DT7 Treadmill Desk
- OL LifeSpan TR5000-DT5 Treadmill Desk
- OL LifeSpan TR5000-DT3 Under Desk Treadmill
- OL LifeSpan TR1200-DT7 Treadmill Desk
- OL LifeSpan TR1200-DT5 Treadmill Desk
- OL LifeSpan TR1200-DT3 Under Desk Treadmill w/ Bluetooth
- OL LifeSpan Solo Under Desk Bike
- OL LifeSpan Airsoft Standing Board
- OL LifeSpan PD1000 MyStride Activity Monitor
- OL LifeSpan BPM 1000i Blood Pressure Motor
- OL LifeSpan Treadmill Belt Lubricant
- OL LifeSpan SP1000 Stretch Partner
- OL LifeSpan Unity Bike Desk
- OL LifeSpan C5i Upright Bike
- Consent to receive SMS Form
 RSS Feed
